当您在克隆或从远程仓库获取数据时,很可能因为网络状况不佳遇到很慢甚至超时的情况,那么此时您可能需要配置 Git 的代理。
Git 支持的传输协议以及判断(点击展开)
在此之前需要先提一下,Git 支持的传输协议有 ssh、git、http 和 https 协议(此外,ftp 和 ftps 也可用于拉取,但在 Git 官方文档中提到是低效且过时的,不建议使用)。
其原生传输协议(即 git:// URL)不做鉴权,在不安全的网络环境下应谨慎使用。
要如何分辨 Git 使用的传输协议呢?可以通过 Git URL 来进行判断:
ssh
ssh://[user@]host.xz[:port]/path/to/repo.git/或[user@]host.xz:path/to/repo.git/
git
git://host.xz[:port]/path/to/repo.git/
http / https
http[s]://host.xz[:port]/path/to/repo.git/
ftp / ftps
ftp[s]://host.xz[:port]/path/to/repo.git/
连接到 Git 仓库最常用的传输协议可以分为两类:
- HTTP / HTTPS 传输协议
- SSH 传输协议
- 使用 HTTP / HTTPS 传输协议连接到 Git 仓库的 URL 实例如下:
1 | http://github.com/cms-sw/cmssw.git |
- 使用 SSH 传输协议连接到 Git 仓库的 URL 实例如下:
1 | git@github.com:cms-sw/cmssw.git |
预先准备
在开始操作之前,你需要明确这些内容:
- 电脑已经安装了 Git(这不是废话吗,23333)。如果你是 Windows 用户,那么本文的命令你需要通过 Git Bash 来执行;如果你是 Linux 或 macOS 用户直接在终端运行即可。
- 知道如何用 vim 编辑文件,退出编辑的基本操作。
Git 使用 HTTP / HTTPS 传输协议的代理方法
针对 Git 使用 HTTP / HTTPS 传输协议的代理方法如下:
- 针对所有域名的仓库:
git config --globalhttp.proxy <protocol>://<host>:<port>
命令注解(点击展开)
--glboal选项指的是修改 Git 的全局配置文件~/.gitconfig(而非各个 Git 仓库里的配置文件.git/config)。<protocol>指的是代理协议,如 http,https,socks5 等。<host>为代理主机,如使用本地代理主机 127.0.0.1 或 localhost 等。<port>则为代理端口号,如 clash 使用的 7890 或 7891 等。- 常见误用:
git config --globalhttps.proxy <protocol>://<host>:<port>,这一写法完全是错误的。请记住: Git 代理配置项正确写法为http.proxy,并不支持https.proxy这一错误写法。 - 如果想了解
<url>的更多模式,如子域名等的情况,可参照 Git 的官方文档 。
- 或者针对特定域名的仓库:
git config --globalhttp.<url>.proxy <protocol>://<host>:<port>
命令注解(点击展开)
--glboal选项指的是修改 Git 的全局配置文件~/.gitconfig(而非各个 Git 仓库里的配置文件.git/config)。<url>指的是你需要使用代理的远程仓库,该<url>支持 HTTP / HTTPS 传输协议的格式:<url>格式为http://example.com或https://example.com
<protocol>指的是代理协议,如 http,https,socks5 等。<host>为代理主机,如使用本地代理主机 127.0.0.1 或 localhost 等。<port>则为代理端口号,如 clash 使用的 7890 或 7891 等。- 常见误用:针对 HTTPS 传输协议(即
https://开头)的<url>代理,命令写成 “git config --globalhttps.https://github.com.proxy protocol://127.0.0.1:7890” ,这一写法完全是错的。请记住:请记住: Git 代理配置项正确写法为http.<url>.proxy,并不支持https.<url>.proxy这一错误写法。 - 如果想了解
<url>的更多模式,如子域名等的情况,可参照 Git 的官方文档 。
实例
针对 Git 使用 HTTP / HTTPS 传输协议的代理方法,在 Windows,Linux,macOS 上用户的操作均是一样的。
也许你光看我上面的内容还看不明白,不妨我们来看下实例部分:
此处以 Clash for Windows 为例子。如图:
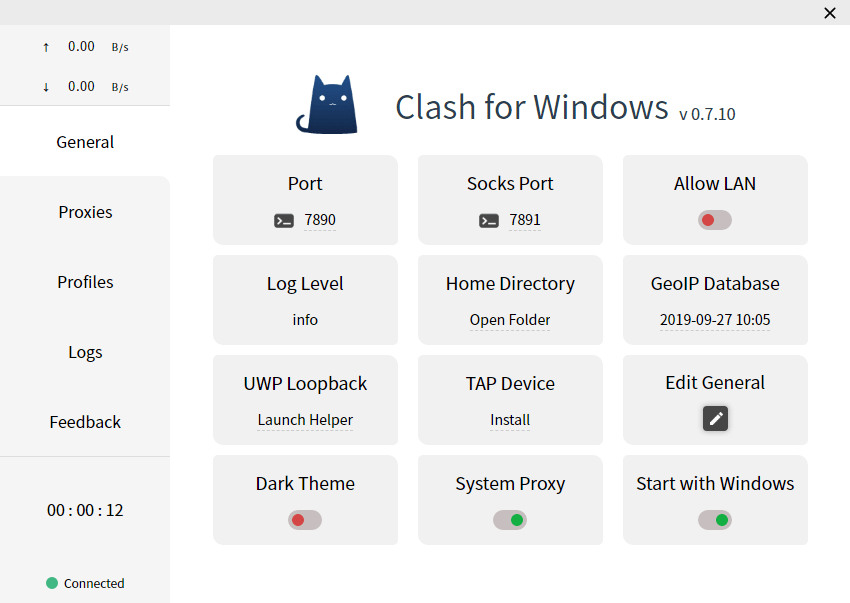
Clash for Windows 既支持 HTTP / HTTPS 协议代理,也支持 SOCKS v5 协议代理。如果你使用其他的代理软件,你可以根据你使用的代理软件的代理协议和本地端口号参考本文修改即可。
针对所有域名的 Git 仓库
根据你的代理软件支持的代理协议选取其中一种即可:
1 | git config --global http.proxy http://127.0.0.1:7890 |
注意:7890 为 Clash for Windows 的 http 代理端口。
1 | git config --global http.proxy socks5://127.0.0.1:7891 |
注意:7891 为 Clash for Windows 的 socks5 代理端口。
针对特定域名的 Git 仓库
前面我们说的是,让所有域名下的仓库都走代理的情况,但是在现实情况下我们并不想这么做。那么现在我来介绍一下针对特定域名仓库走代理的做法,此处以 GitHub 为例:
当我们在 GitHub 仓库使用 HTTPS 传输协议克隆源码时,我们往往是这么做的的:
1 | git clone https://github.com/<user>/<repository>.git |
那么我前面命令注解所提到的 <url> 就是 https://github.com
根据你的代理软件支持的代理协议选取其中一种即可:
1 | git config --global http.https://github.com.proxy http://127.0.0.1:7890 |
1 | git config --global http.https://github.com.proxy socks5://127.0.0.1:7891 |
Git 使用 SSH 传输协议的代理方法
在这种情况下,Git 依靠 ssh 程序处理连接; 为了通过代理进行连接,您必须配置 ssh 程序本身,在 ~/.ssh/config 文件中设置 ProxyCommand 选项,通过在 ProxyCommand 中声明,使用不同操作系统下的程序来通过代理建立连接。
macOS 是通过在 ProxyCommand 中声明
nc程序(该 nc 程序命令为系统自带的 OpenBSD 版本的 netcat 提供)来代理的;Linux 一样可以通过
nc程序、但是 Linux 上nc程序有 2 种 netcat 版本可以提供,分为 Nmap 版和 OpenBSD 版。如果是 OpenBSD 的版本,则nc命令与 macOS 相同;如果是 Nmap 版本的,nc其实是指向ncat程序的符号链接,则其具体命令不一样;各 Linux 发行版本下 netcat 软件包名如下表:Linux 发行版本 / netcat 软件包名 Nmap 版 OpenBSD 版 Fedora 系列 nmap-ncatnetcatDebian 系列 ncatnetcat-openbsdWindows 下则是通过安装 Git for Windows 附带的
connect程序。
相关 man 手册(点击展开)
- ssh_config(5) ProxyCommand 的内容:
1 | ProxyCommand |
- Nmap 提供的 nc(1) 程序
--proxy和--proxy-type的内容:
1 | --proxy host[:port] (Specify proxy address) |
- OpenBSD 提供的 nc(1) 程序
-X和-x选项的的内容:
1 | -X proxy_protocol |
- Git for Windows 默认附带的 connect 程序
-H和-S选项的内容
1 | -H option specify hostname and port number of http proxy server to relay. If port is omitted, 80 is used. You can specify this value by environment variable HTTP_PROXY and give -h option to use it. |
实例
接下来的操作,请按照你的系统、选择的 netcat 的实现版本以及所使用的代理协议进行选择:
Linux(OpenBSD 版 netcat)和 macOS 用户
编辑 ~/.ssh/config 文件
1 | vim ~/.ssh/config |
给文件加上如下内容:
1 | Host github.com |
解释:
Host后面 接的github.com是指定要走代理的仓库域名。- 在 ProxyCommand 中,Linux 和 macOS 用户用的是 OpenBSD 版本的
nc。-X选项后面接的是connect的意思是 HTTPS 代理。-x选项后面加上代理地址和端口号。- 在调用 ProxyCommand 时,
%h和%p将会被自动替换为目标主机名和 SSH 命令指定的端口(%h和%p不要修改,保留原样即可)。
编辑 ~/.ssh/config 文件
1 | vim ~/.ssh/config |
给文件加上如下内容,2种任选一个:
Host后面 接的github.com是指定要走代理的仓库域名。- 在 ProxyCommand 中,Linux 和 macOS 用户用的是 OpenBSD 版本的
nc。- 在调用 ProxyCommand 时,
%h和%p将会被自动替换为目标主机名和 SSH 命令指定的端口(%h和%p不要修改,保留原样即可)。- 如果
-X选项后面接的是数字 5,那么指的就是 socks5 代理。- 当然你直接不写上
-X选项也是可以的,因为在没有指定协议的情况下,默认是使用 socks5 代理的。所以以下 2 种的写法效果一样 ,都指的是走 socks5 代理:
①. 第一种
1 | Host github.com |
或
②. 第二种
1 | Host github.com |
Linux(Nmap 版 netcat)用户
编辑 ~/.ssh/config 文件
1 | vim ~/.ssh/config |
给文件加上以下内容:
1 | Host github.com |
解释:
Host后面 接的github.com是指定要走代理的仓库域名。- 在 ProxyCommand 中,Linux 用户用的是 Nmap 版本的
nc。--proxy-type选项后面的http的意思是指使用 HTTP 代理。- 在调用 ProxyCommand 时,
%h和%p将会被自动替换为目标主机名和 SSH 命令指定的端口(%h和%p不要修改,保留原样即可)。
编辑 ~/.ssh/config 文件
1 | vim ~/.ssh/config |
给文件加上如下内容:
1 | Host github.com |
解释:
Host后面 接的github.com是指定要走代理的仓库域名。- 在 ProxyCommand 中,Linux 用户用的是 Nmap 版本的
nc。--proxy-type选项后面的socks5的意思是指使用 socks5 代理。- 在调用 ProxyCommand 时,
%h和%p将会被自动替换为目标主机名和 SSH 命令指定的端口(%h和%p不要修改,保留原样即可)。
Windows 用户
编辑 ~/.ssh/config 文件
1 | vim ~/.ssh/config |
给文件加上以下内容:
1 | Host github.com |
解释:
Host后面 接的github.com是指定要走代理的仓库域名。- 在 ProxyCommand 中,Windows 用户用的是
connect。-H选项的意思是 HTTP 代理。- 在调用 ProxyCommand 时,
%h和%p将会被自动替换为目标主机名和 SSH 命令指定的端口(%h和%p不要修改,保留原样即可)。
编辑 ~/.ssh/config 文件
1 | vim ~/.ssh/config |
给文件加上如下内容:
1 | Host github.com |
解释:
Host后面 接的github.com是指定要走代理的仓库域名。- 在 ProxyCommand 中,Windows 用户用的是
connect。- 单独的
-S选项指的就是 socks5 代理- 在调用 ProxyCommand 时,
%h和%p将会被自动替换为目标主机名和 SSH 命令指定的端口(%h和%p不要修改,保留原样即可)。
如何取消 Git 和 ssh 的代理
这里就不多说了,说了那么多,我们无非就是修改了 2 个文件,即 ~/.gitconfig 和 ~/.ssh/config ,删除或注释我们增加的相应内容(在相应行的开头加上 # 即可)即可完成取消代理。
参考链接
- Git - git-config Documentation
- Configure Git to use a proxy
- Tutorial: how to use git through a proxy
- ssh_config(5) - OpenBSD manual pages
- ncat(1) — Linux manual page
- nc(1) - OpenBSD manual pages
- SSH Proxy Command – connect.c
- How can I use SSH with a SOCKS 5 proxy?
- Git 基础——代理
- SSH via HTTP proxy in OSX